The cheapest way to fix a damaged mold insert is not necessarily the repair with the lowest quote. It is the option that restores acceptable production with a manageable risk of another stoppage.
A small chip on a shut-off edge can matter more than a larger mark on a nonfunctional face. A repaired surface may look excellent yet still fail its dimensional or appearance requirements. A new insert can also disappoint if the mating pocket or original failure mechanism remains unresolved.
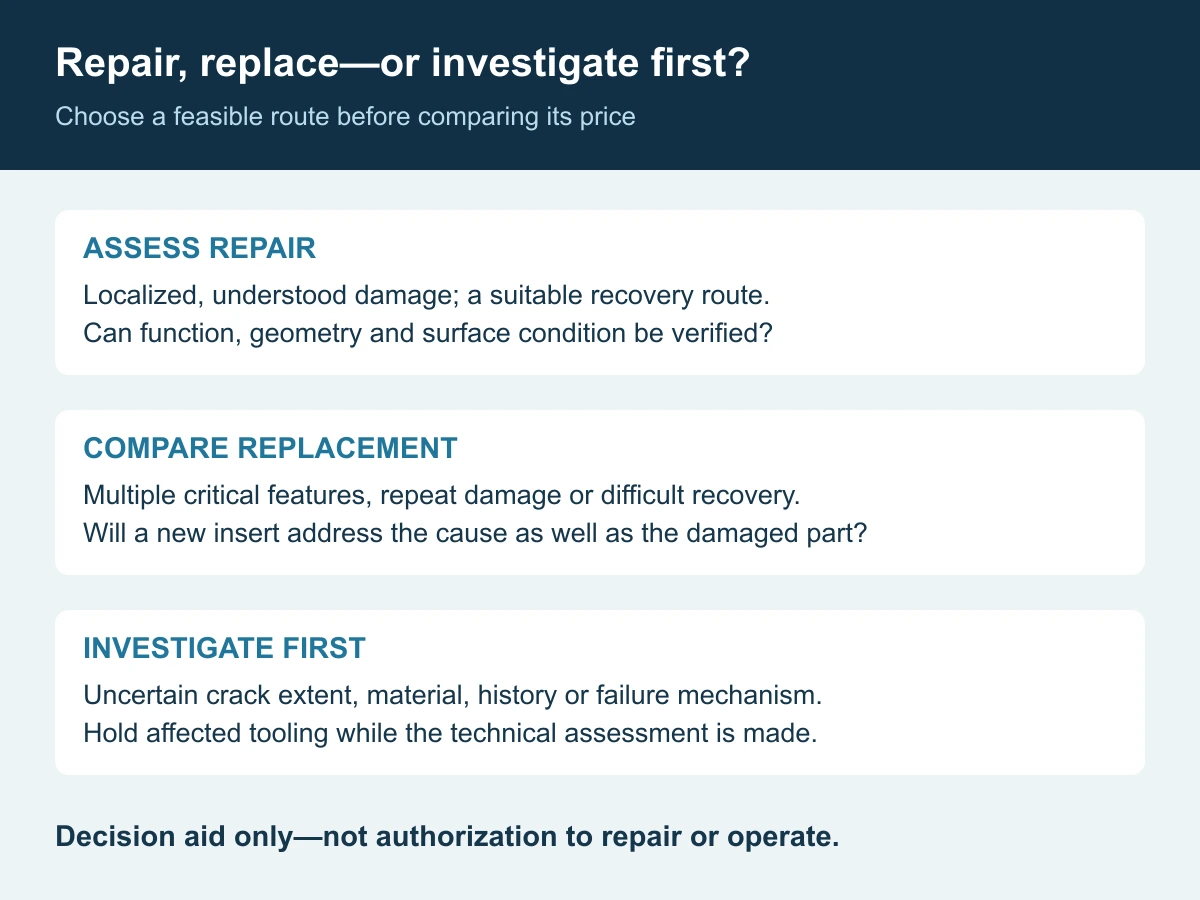
Consider repair when the damage is localized, its cause and extent are understood, the material is known, and an appropriate repair route can restore the required geometry and surface condition. Favor replacement when damage or uncertainty undermines reliable recovery, critical features cannot be restored economically, or repeated repair threatens delivery. If the failure mechanism is unclear, investigate first. Compare both routes through inspection, fitting and an agreed production trial—not just through completion of welding or machining.
1. Confirm the cause before paying to restore the symptom
A molded-part defect is not enough to diagnose a damaged insert. Flash, for example, can be associated with injection or packing conditions and insufficient clamp force, as Autodesk’s Moldflow documentation explains.[1] It can also warrant examination of the actual parting or shut-off interface. The point is to distinguish the causes, not to increase clamp force indiscriminately.
Record where the defect appears, when it started, whether it is confined to one cavity, and whether a process, resin, assembly or maintenance change preceded it. Compare the suspected area with the mating surface and the approved geometry. Preserve useful photographs and measurements before removing material.
If a crack is suspected, keep the affected tooling out of service pending a qualified assessment. A surface indication does not reveal the full depth or remaining integrity. Liquid penetrant testing detects flaws open to the surface; it does not rule out internal damage, and its sensitivity depends on surface condition and technique.[2] Choose the inspection method with a competent specialist for the steel, geometry and suspected defect.
Replacing the insert without addressing a damaged pocket, inadequate support or interference can transfer the same problem to the new part. Separate the cost of correcting the cause from the cost of restoring the insert; the cause may need attention under both options.
2. Use a three-way decision, not a repair-versus-scrap reflex
This screening table identifies the next review. It does not approve welding, continued operation or a particular remaining service life.
| Finding | Direction worth assessing | Question that decides it |
|---|---|---|
| Isolated wear or chip; surrounding features remain sound | Assess a localized repair against replacement. | Can the required geometry, material condition and finish be recovered and verified? |
| Shallow surface damage where removal is possible | Assess controlled refinishing; welding may be unnecessary. | Will removing material stay within the permitted profile, edge and dimensional limits? |
| Damage across several locating, seating or forming features | Obtain a replacement proposal alongside the repair assessment. | How many coupled requirements would the repair need to recover? |
| Suspected crack, uncertain depth or unknown prior repair | Hold for assessment before selecting a route. | Can the extent, material condition and suitability for recovery be established? |
| Repeated failure in the same area | Review the design, support and operating conditions. | What would prevent recurrence under either route? |
| Optical, textured or tightly controlled appearance surface | Compare repair finishing risk with a new insert. | Can the repaired region meet the agreed molded-part appearance, not merely a roughness value? |
Damage size alone is a weak decision rule. A repair that is physically possible may still be unattractive if it needs difficult blending, repeated trials or an acceptance outcome that cannot be demonstrated before installation.
3. Ask what the damaged surface does
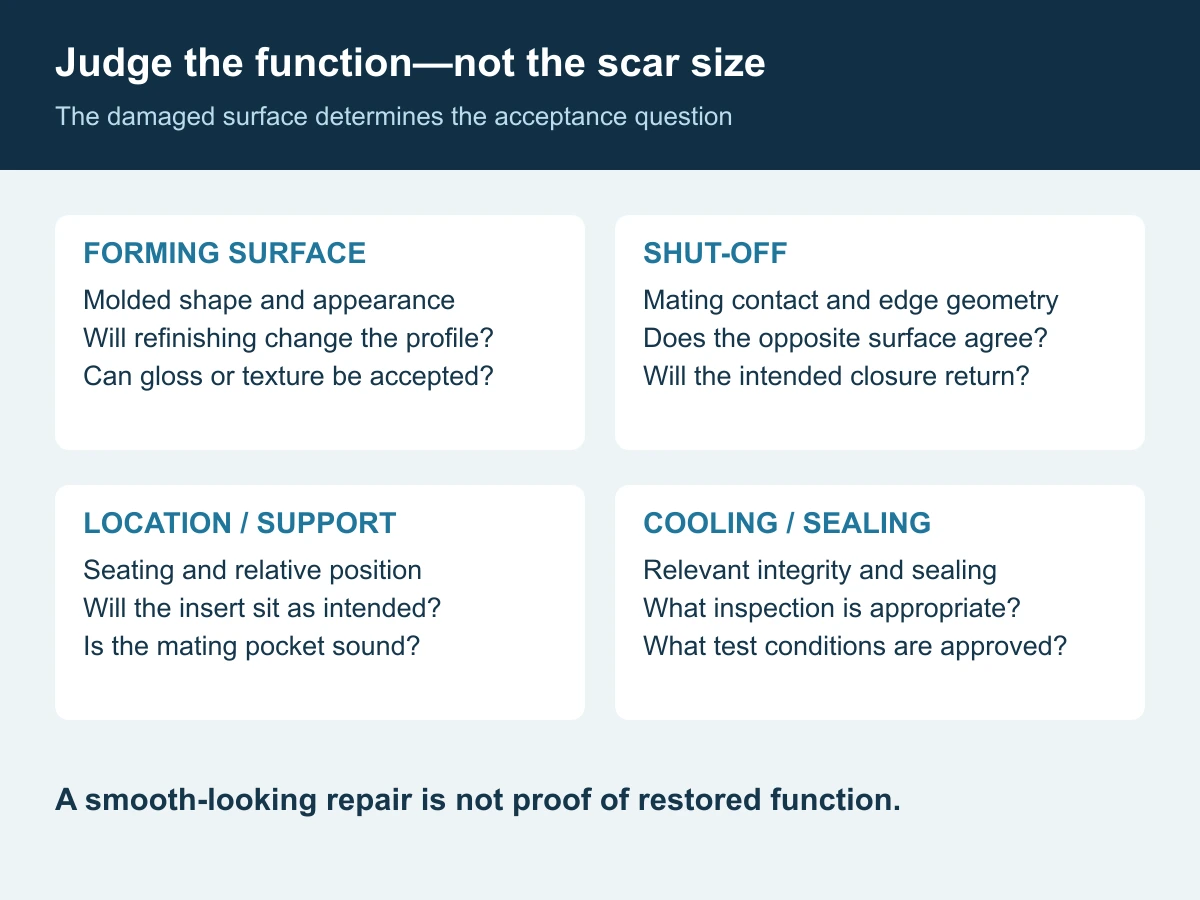
On a forming surface, evaluate the effect on the molded geometry and appearance. Refinishing removes material; it can change the cavity profile even if the surface becomes smoother. Any allowance for correction needs to come from the approved requirements, not an assumed “small enough” removal.
On a shut-off, assess the mating contact and edge geometry. Restoring one side without checking the other may not restore the intended closure. A local defect can require an assembly-level check even when the rest of the insert is dimensionally acceptable.
On a locating or seating face, assess position and support. A repaired insert that sits differently can change relationships elsewhere in the mold. Do not use the visibly damaged face as an unquestioned measurement reference.
Near a cooling or sealing feature, include the relevant integrity and sealing requirements. A good cosmetic result on the outside does not establish the condition of an internal passage. Any leak or pressure test needs a defined, approved procedure and limits.
4. “Can be welded” is only the start of a repair assessment
Ask the repair specialist to identify the steel, its present condition, previous repairs, any coating, and the intended finishing operation. Unknown material or repair history is a reason to resolve uncertainty—not a reason to choose filler by appearance.
Uddeholm explains that weld-deposit composition depends on the filler, the base steel and their mixing during welding. For plastic-molding tools, its listed compatibility considerations include hardness, wear resistance, polishability and photoetchability.[3] A deposited area therefore needs assessment against the required function; matching a nominal hardness alone does not establish every relevant property.
Laser welding can offer concentrated heat input and lower distortion than many alternative welding processes. TWI also describes a narrower heat-affected zone as a benefit.[4] Lower heat input is not a guarantee of zero distortion, unchanged properties or an invisible repair. Suitability still depends on the particular tool steel, geometry and procedure.
Before approval, request a defined repair scope: damage preparation, compatible deposition method where needed, any grade- and condition-specific thermal treatment, finish machining, and verification. No universal preheat, post-treatment temperature or maximum repair depth can responsibly be prescribed for every mold insert.
For visible plastic surfaces, agree how appearance will be accepted. A roughness reading alone may not settle differences in gloss or texture across a repaired region. If an actual molded sample is necessary to decide, include that trial and its uncertainty in the plan.
5. Compare cost through an acceptable restart—not through the workshop invoice
Put both options on the same basis: an identified insert installed in the intended mold, meeting the agreed part-quality requirements. Include diagnosis, corrective work on the mating mold, repair or new manufacture, finishing, transport, fitting and the planned trial. Add downtime or outside production costs only where they genuinely differ between the routes, and avoid counting the same loss twice.
Illustrative arithmetic—not market prices or a Huicheng quotation:
| Included item | Repair route | Replacement route |
|---|---|---|
| Repair work or new manufacture | $1,100 | $2,200, including specified finishing |
| Separate repair finishing | $400 | Included above |
| Planned fitting, inspection and trial | $600 | $700 |
| Transport | $200 | $200 |
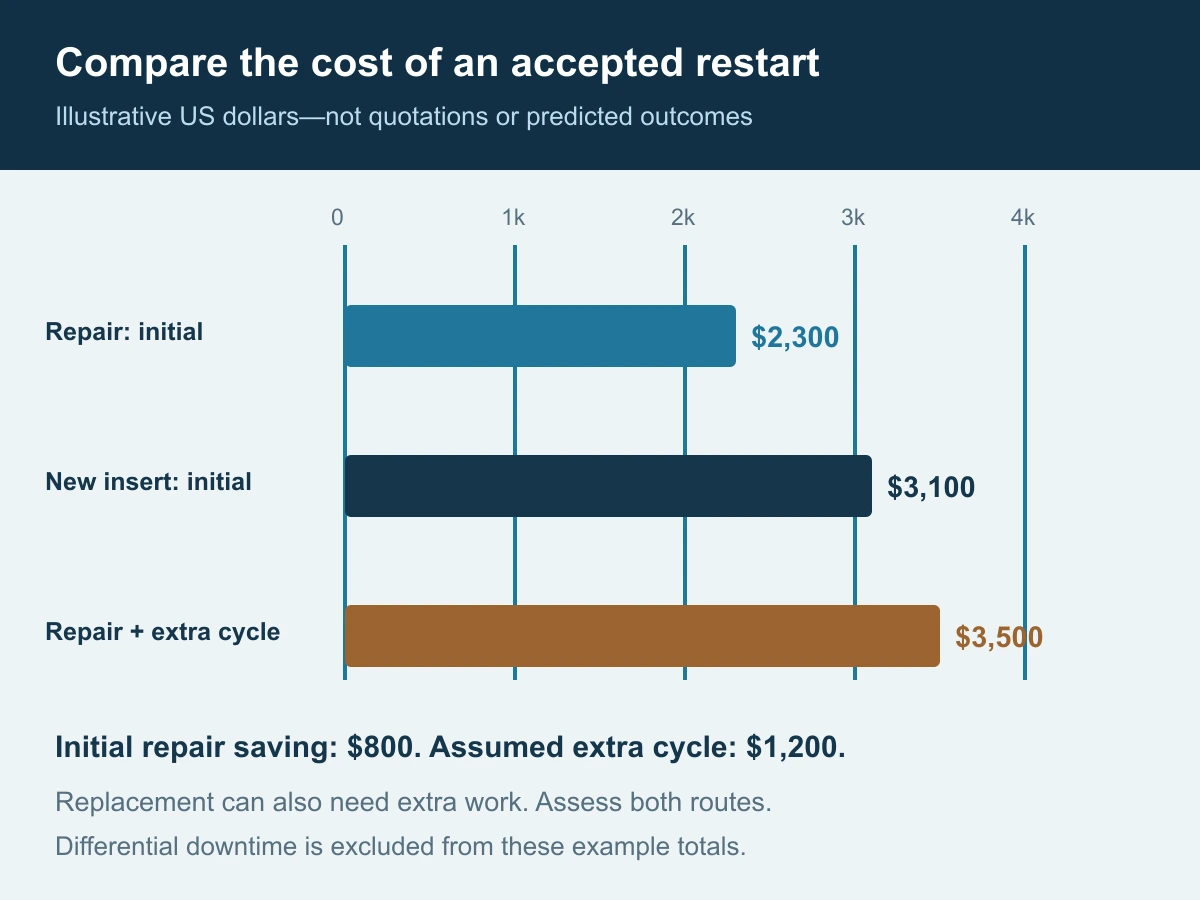
| Initial compared total | $2,300 | $3,100 |
On these assumptions, repair saves $800 initially. If one additional repair-and-trial cycle costs $1,200, its total becomes $3,500—$400 above the initial replacement total. That does not mean the extra cycle will occur or that replacement is risk-free. It shows how sensitive the apparent saving is to a repeat intervention.
Ask the same downside question for the new insert: what if the pocket needs correction, the design is not fully defined or another fitting trial is required? Use credible ranges from the involved suppliers and your own production records. Do not invent failure probabilities to make one route look preferable.
Compare schedules in the same way. “Two days to weld” and “ten days to manufacture” are not comparable if the first excludes inspection, finishing and a trial slot. Request the date each route could reasonably reach the same agreed acceptance point, with its dependencies stated.
6. Define the evidence needed to return the insert to service
Agree the acceptance plan before selecting the route. Otherwise, “repair complete” may mean deposited and polished, while the buyer expects installed, trialed and ready for production.
- Geometry: check restored features and other dimensions or relationships that the work could affect. Preserve usable earlier evidence for unaffected requirements where its applicability is established.
- Material and surface condition: specify relevant hardness, surface integrity and finish checks for the chosen route. Do not assume one test covers them all.
- Assembly: confirm locating, seating, shut-off or sealing behavior in the assigned mold, as applicable.
- Molded-part result: define the relevant dimensional and appearance criteria, trial conditions and who makes the acceptance decision.
A satisfactory trial demonstrates the result under the tested conditions; it does not establish a guaranteed remaining tool life. Where the repair remains provisional, document its restrictions and the follow-up decision. Do not describe a short trial as proof that the insert is “as good as new.”
7. Sometimes repair and replacement belong in the same plan
Repair may be considered as a temporary bridge while a replacement is prepared—but only if the responsible technical assessment supports its use. Urgency does not make an unresolved crack or unsafe condition acceptable.
For a bounded bridge plan, identify the part, permitted use, agreed checks, stop criteria and replacement milestone. The tooling and production teams should set these for the actual condition; a generic number of shots is not a reliable allowance.
For repeated localized failure, use the replacement project to review the cause. A changed detail, material or support arrangement may be worth evaluating, but it needs an approved design decision. Simply copying the worn or repaired insert can preserve the very condition the replacement is meant to address.
8. What to send for a useful replacement proposal
When the assessment points toward replacement, Huicheng can manufacture custom precision mold inserts to customer drawings and can also help customers prepare drawings. Provide enough information to distinguish the intended design from wear, previous fitting and damage.
- The drawing and model revision, or the available sample and information needed for drawing assistance.
- Marked photographs showing the damaged location, plus relevant measurements and molded-part defects.
- Known steel, hardness, coating and previous repair history; identify unknowns rather than guessing.
- The mating-pocket and support information relevant to fit or the suspected failure.
- Required finish, appearance and acceptance evidence, including any trial responsibilities.
- Quantity, spare requirements and the date an accepted insert is needed—not only the preferred dispatch date.
Agree drawing-assistance scope, charges and design approval before manufacturing. This guide discusses repair as a purchasing option; it does not state that Huicheng provides welding, laser repair, failure-analysis testing or in-mold trial services. Confirm any additional service separately.
Buyer questions
Is there a percentage of replacement price above which repair is never worthwhile?
No universal percentage works. Required finish, remaining production need, available spares, recovery uncertainty and the cost of another interruption can change the decision. Compare complete, technically feasible routes rather than applying a fixed 50% rule.
Can polishing alone remove insert damage?
Sometimes a surface can be recovered by controlled material removal. First establish whether the resulting geometry and edges will still meet requirements. Removing the visible defect is not sufficient if it changes the molded part or mating contact unacceptably.
Does a crack always require a new insert?
It requires a competent assessment before continued use or repair. Extent, location, material condition and a verifiable repair route matter. If those cannot be established with acceptable confidence, replacement should be evaluated rather than treating a surface weld as an automatic solution.
Is a replacement automatically the lower-risk option?
No. It can remove uncertainty associated with the damaged part, but fit, design definition and the original failure cause still need attention. A clear acceptance plan is important for both repair and replacement.
Sources and footnotes
Sources support the specific molding, inspection and welding principles cited. The decision table, purchasing checklist and cost example are original editorial tools, not standards requirements or customer outcomes. This guide is not a repair procedure or a fitness-for-service approval; actual decisions require the relevant tooling, materials and inspection assessment.
- Autodesk Moldflow. Flash. Supports process and clamping factors as possible causes of flash; not a diagnosis of a particular mold. Back to text ↑
- TWI. What is liquid penetrant testing? Scope and limitations of surface-breaking flaw detection. Back to text ↑
- Uddeholm. Welding. Filler/base-material compatibility and relevant tooling properties. Back to text ↑
- TWI. What are the benefits of using lasers for welding? General low-heat-input and distortion advantages; not a guarantee for a specific insert repair. Back to text ↑